CLICK HERE FOR FREE BLOGGER TEMPLATES, LINK BUTTONS AND MORE! »

Tuesday, June 28, 2011

Part 1 of Mystery Tin Project

For those of you following, I would like to personally thank you for supporting me and my creative streak.  I have several projects that I am working on for the next few weeks.  I have been asked if I could give a tutorial on how to make my vintage flowers and that is something that I'm working on as well.
I'm not a teacher by trade, but I will certainly try to teach you all how to make these wonderful flowers.  I just have to try to figure out Ustream.
So, the Mystery Tin Box will have a Part 2, don't you just love surprises!  I'm working on Part 2 of the box, so just be sure to stop by again.
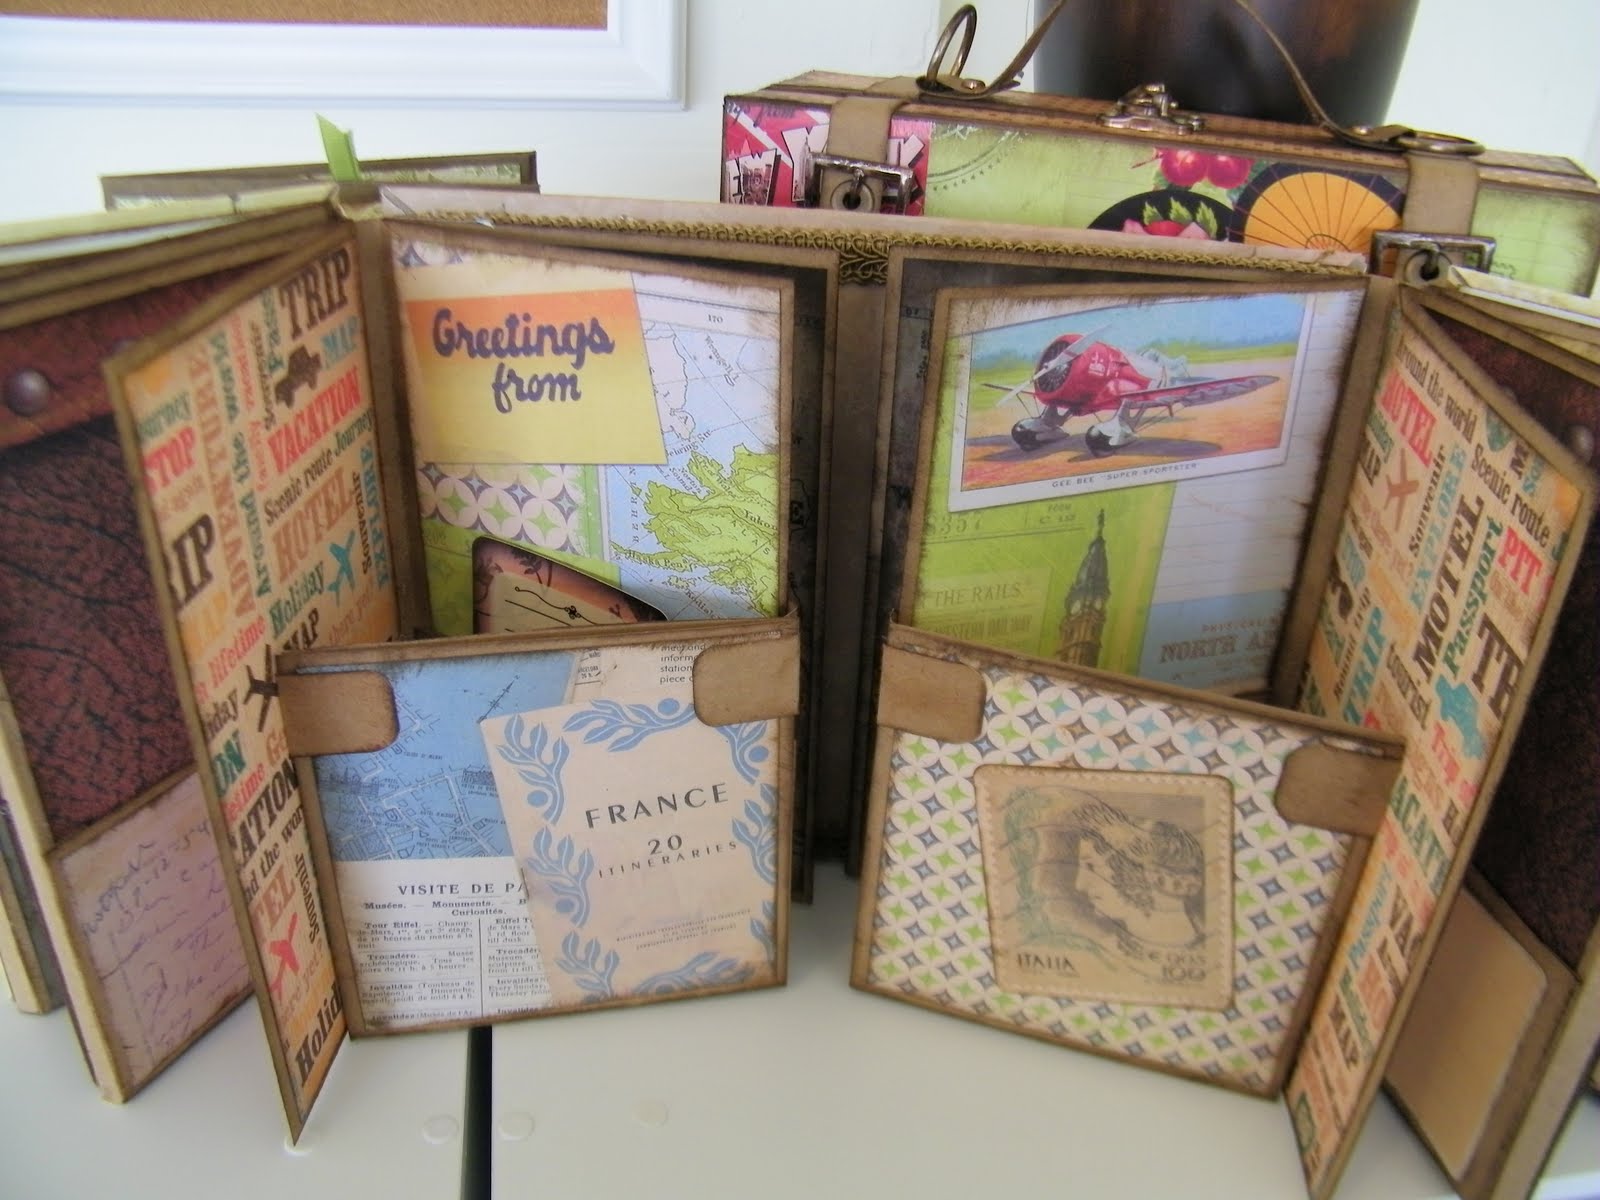
I love the way you can take something new and age it by just using some distressing products.  For this particular project I used Tea bags to age the lace ribbon.  I then took Tim Holtz distressing ink and distressed the edges of DCWV Tradewind stack. I removed the hardware that came with the tin and added some that I picked up at the hardware store.  Just these few simple steps made this ordinary tin box look extraordinary.
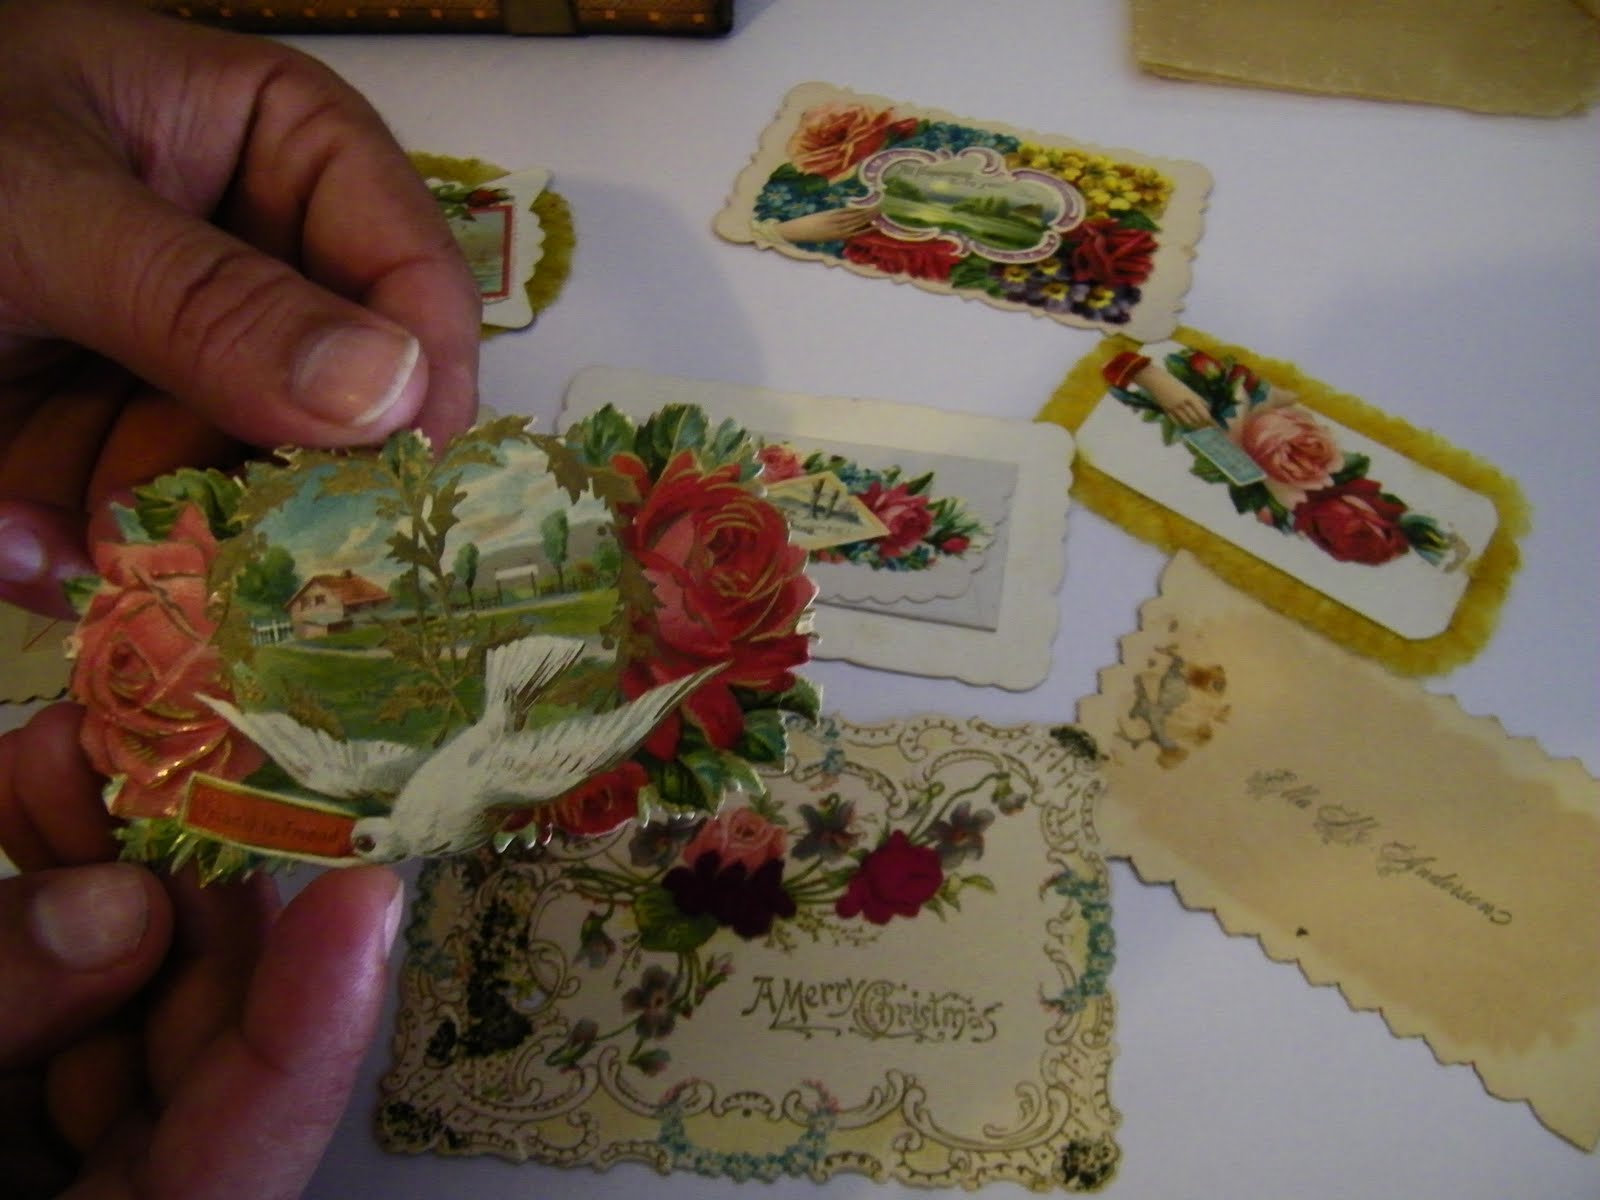
DOES THIS LOOK FAMILIAR?


The lighting in my craftroom is not the perfect lighting, but I have to make do with what I have, so I'm very sorry.  If you like what you see, please be sure to post a comment.  All comments are welcomed.  Also remember that I will be giving away a FREE Gift to one follower 25, so signup, tell a friend, neighbor, family member, or other paper addicts. 
Oh, and for those of you near Rock Springs, Wy, I will have having Scrap Crops at the Library.  The first one is scheduled for Saturday, July 16, 2011 from 12 - 5pm (FREE).  Be sure to come if you are a paper addict like me.  Since it's a crop I will not be teaching anything in particular.  Bring your scrapbooking projects and supplies.  It's just a great day for paper addicts to get together, scrap, swap ideas, and enjoy some scrapbooking company. 


Sunday, June 26, 2011

Creative Mystery

Here is what I will be working with next.


I'm growing very fond of the DCWV stacks and  for this particular project I will be using DCWV Tradewinds and Natural Stacks.  The flowers that you see near the tin is actually made using both Stampin Up! Early Expresso & Old Olive cardstock and DCWV Natural Stock. 

There will be some distressing using Tim Holtz Ideology Walnut Distress Ink, Tim Holtz Metal Vintage Embellishments and more.  I am not quite sure what I will actually do with this Tin but whatever I decide to do it will be a mystery to both you and me. 

Oh, and I will be dying some lace with tea bags.  So, let's see what I will be creating next!

Friday, June 24, 2011

Colorful than LIFE Reading Journal

Life can definitely inspire us with many colors.  Sometimes when we least expect it we are feeling blue, but then there are the times that we are full of bright and beautiful colors, almost like the kind you see in the tropical island "Carribean" colors.  I look at life with a scope of lovely beautiful tropical colors, because LIFE is way to short to look at things with the blue scope.  So, to celebrate life I created this wonderful Colorful than Life Reading Journal. 
A co-worker (Carla Ceballo) ordered a reading journal that was full of vibrant colors, but she wanted to incorporate some vintage cards that belonged to her grandmother, Mrs. Joyce Wilson.  I fell in love with the vintage pieces and new immediately that I wanted to use the DCWV Colorful Life Paper Series for her Reading Journal.  If you are like me you love things that are vintage and has a story behind them, and Carla shared with me the fact that these were momentos that her grandmother and her great-grandmother (Margaret Kenegy) shared with each other throughout the years. 
Here's what she gave me:


Aren't these just amazingly beautiful!  Now all these pieces were embossed, which gave it a more unique look to them.  So, what I did was to incorporate a few of these in her Colorful than Life Reading Journal.

Here is what I came up with, something that can be done with a simple composition notebook and a Zutter Bind-it-all machine. 


The Reading Journal's are $30(Pre-made) and I'm taking orders.  They come with a bookmaker, inside pockets and tabs, Ribbon Notebook Marker, and Wallet Portfolio (paper).  All you need to be an inspired creative writer! 
Thank you Carla for sharing your grandmother's beautiful vintage postcards.
To Order please email me at scrappinpretty@yahoo.com

Monday, June 20, 2011

Part 3 of Travel Recipe Box

Travel Recipe Box
Well I have finally finished the recipe card holders for my Travel Recipe Box.  My next step into completing this project is creating the recipe cards themselves.  Here is were I will share the recipes that I have gathered from family, friends, and co-workers throughout our travels.

I added pockets to my mini recipe album, because I wanted a place to add notes etc...  The one's I put together for the kits, will definitely not have this paper, I just liked this paper for myself, since it is one that my family will be using and it went with some of my kitchen decor.  I have ordered some new paper and once it arrives I will definitely share it with you all.  The kit will include all the embellishments, hardware, paper, and chipboard along with the written instructions. 


My wonderful husband was my hand model for this project, because I had way too much distressing ink on my fingers, lol!  Anyway, I will be completing this project this week.  I will have the actual recipe cards done.  I'm hoping to find a typewriter around here that I could use to type the recipes.  I think that typing it on an old typewriter may give the cards a bit of character.  So, we shall see what the old typewriter will do to the cards.
Once the cards are complete the kit will go up for sale, so let me know if you are interested.  Again, I must stress that the kit will not include this paper, this was paper I picked for myself.  I like to choose and pick, so I will probably will let you choose and pick the paper designs, only because it's only fair, especially if you are making it for yourself or as a gift.
So, come back to see Part 4 of the Travel Recipe Box.  Enjoy!

Friday, June 17, 2011

Part Two of Travel Recipe Box

TRAVEL RECIPE BOX

Here is a FABULOUS Chic RECIPE Card HOLDER.  I think this is something anyone that is passionate about cooking would definitely love to have.   The recipe card holder is made with chipboard and designer paper.  I used Tim Holtz Metal Embellishments and his 2 ring binder for the inside of the recipe box.  I will later post measurements, but since I'm not completely finished with the box I want to hold off.  Kits will go on sale once the recipe cards are decorated.


It fits perfectly inside the box!

As you can see I'm still working on this one, but I wanted to show you Part 2.  I will try to have this project completely finished by the end of this coming week.  So, come back for Part 3 of Travel Recipe Box. 
Kits will be available for SALE!

Vintage Flower

It's another creative day at Scrap N Pretty's Room.  I am working on vintage flowers, and here is one that I truly love.  I used Stampin Up! whisper white cardstock, which I dyed with tea bags and a few drops of Stampin Up! Concord Crush ink spotter.  To get a darker color since the paper was so white, I left the paper sit in the concoction for 3 hours.  I then removed it from the mixture and using an old iron, I ironed the paper
I punched out 4 of the EK large & small 5 petal punch.  I trimmed the edges of the leaves to give it a more realistic yet vintage look and I distressed the edges with the Concord Crush Classic Inkpad and Tim Holtz Distress Ink "Walnut Stain".    Once I did that I molded the leaves into shape.  The leaves were punched out using McGill's leave punch 7/8 x 1 3/8".  I hand embossed the leaves and distressed them using Tim Holtz Distress Ink "Walnut Stain". 

Once I had all the flowers and leaves made, I punched out two large scallop circles and started to glue the leaves and flowers to one of the scalloped circles.  The flowers were topped off with a feather and a beaded stem that I picked up at Hobby Lobby.  To hide the back I glued the second scalloped circle to the back aligning it to the base (scalloped circle).
Here you have it the finished piece.  Just remember it is all paper with the exception of the beads and feathers.  Enjoy!


Sunday, June 12, 2011

Part One of Travel Recipe Box

So, here you have it, Part 1 of Travel Recipes.  This great box will hold all your favorite recipes, those you have shared with family and friends and those you picked up during your travels.  As a prior military wife, everytime we moved from one base to the next we met a great group of people and we all swapped recipes. 
My favorite recipes came from being stationed at Lackland AFB, Tx.  San Antonio, Tx had a little bit of everything, from great Italian restaurants to the best Authentic Mexican restaurants.  So, one of the things we picked up while we were there was how to make some of our favorite Mexican dishes. 
PART ONE TRAVEL RECIPE BOX

As you can see this box will have alot to say about our time in the military.  Not only will it say of the different cultures we were exposed to, but also the different flavors.
Part 2 of this box will be the best part to make.  I will have Part 2 posted by the end of this week.  If you are interested in purchasing a Travel Recipe Box, email me at scrappinpretty@yahoo.com.

Gift Giveaway!

I will be giving away a Free GIFT to my LUCKY 25th follower. If you happen to be FOLLOWER 25, you will be recieving a FREE GIFT, and trust me it will be GOOD!  So, follow my blog and be one of the LUCKY WINNERS!   I will continue giving these gifts away until I have 1,000 followers. The 1,000th follower shall recieve a gift that will amaze and astound you.  So come, follow and recieve wonderful gifts :)

You are one step closer to being a WINNER!

The Big Moment has ARRIVED!!!!!

So, here it is ladies the moment, we have all been waiting for.  All the hard work and my long nights were ALL definitely worth it.  I have put more hours into this project than any other project.  The design is a Kathyorta's, but the hard work and effort was me me me!  I love how it turned out and I hope you  do to.

So, just close your eyes, and let me bring out the big BANG!  This my friends is a definite WoW factor!  I love what you can create with paper.  So, do you still have your eyes closed?  Okay Okay you can open them up now, because here it is....


So, if you are asking yourself what is coming next, just think recipes!!!!!